
Concerning your case, we sincerely recommend Samsung Data Recovery to you. Samsung Data Recovery is the wisest choice for you to fix this problem. Many users of this software are pretty satisfied for its convenience, efficiency and mighty features. And we guarantee that with Samsung Data Recovery, you can get the deleted photos and videos without delay. Why? Because you just need to finish a few steps of operation, the needed files will come back at once. Samsung Data Recovery supports not only various Android brand, but different scenarios, like deleted, system crash, forgotten password etc.


Now, let’s see how to recover deleted photos videos from Galaxy J7.
Steps to recover deleted photos videos from Galaxy J7
Step 1. Launch Samsung Data Recovery and Connect Your Device to the Computer.
Run Samsung Data Recovery on the computer and connect your Galaxy J7 to computer via USB.
During the recovery, please close any other management software and background applications.

Step 2. Enable USB Debugging
If you didn't enable the USB debugging on your device before and your Android phone can’t be recognized, you will get a pop-up message on your device and need to enable the USB debugging now. If Dr. Fone works properly, you can skip this step.

Step 3. Select File Type to Scan
Once your device is detected by the program, you can check the type of data that you'd like to recover. Select photos and videos and then click "Next" to continue the data recovery process.

Step 4. Scan Your Device for Lost Data on Your Galaxy J7
Press "Start" button to begin analyzing and scanning your device.
Choose the "Standard Mode" or the "Advanced Mode" to continue according to your need. It is best to root your phone in advance for recovering lost data, so we recommend you to try the "Standard Mode" first. If that mode does not work, choose the advance mode.

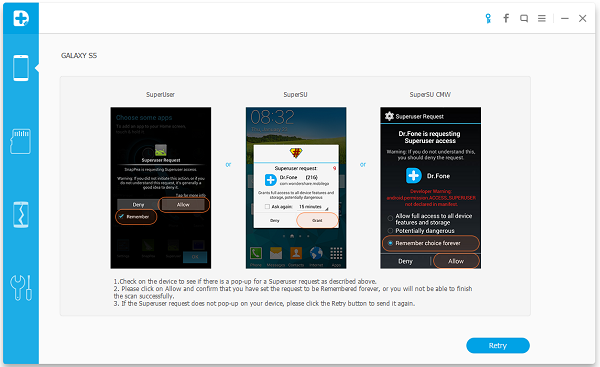
Note:
1.This process will take a few minutes. Just be patient, since precious things are always deserved to be waited.
2.When a Superuser authorization appears in the scan, click "Allow" to confirm it. If not, just forget it.
Step 5. Preview and Restore Deleted Data on Android Devices
After the above steps, you can preview the found data one by one. Check the items of photos and videos you want and click "Recover" to save them all on your computer.

Note: Both deleted and existing data on your Android device will be shown to you after scanning. If you do not want the repeated items, click the button of "Display deleted files only" to separate them or use the search function on the top right to search what you need in the scan result.
More Related Articles:
How to Recover Deleted Text Messages from Samsung J1
Hello there!
ReplyDelete